Friday, October 30, 2015

Fashion Friday – favorite jackets

favorite jackets

Happy Friday everyone!  Quick post tonight because this week has been pure madness and I need to gear up for the weekend which will no doubt be even crazier!  Nothing like already hyper kids collecting sugar.  Are you ready moms?  :)  Up early for a Halloween parade and helping with three class parties tomorrow.  I […]

The post Fashion Friday – favorite jackets appeared first on The Sunny Side Up Blog.

hairpin desk - look for less

Little girlfriend really, really wants a desk in her room. And it's not because her brother has one…..so she says. ;) She's an artsy type that loves to draw, and she wants her own creative space where she can also do homework. Her room is on the small side and is already pretty filled furniture wise with her great grandmother's hand-me-down bed, dresser and nightstand. So I've been looking for a small desk that won't take up too much visual space. Also being that her furniture is on the traditional side I'm leaning toward something a bit more modern looking.

Here's a peek at what we're starting with in her room. In case you can't tell, this room already totally matches her spunky personality.

leo comforter, quilt - HomeGoods, stripe pillows - similar, count your blessings pillow

I've long loved the look of a hairpin desk, and I think this simple look would be perfect in her room.

hairpin desk - via design sponge
Design Sponge

hairpin desk - via style me pretty
Style Me Pretty
So I all was all ready to snag this desk from World Market while it's currently on sale for 25% off………

hairpin desk  - World Market

until I found this one at Walmart for $60!

hairpin desk - Walmart
The dimensions are almost identical; and I kind of love the teal legs, although I could always spray paint them a different color. The Walmart desk actually comes in 2 other color ways, and I'm considering the oak and grey combo but that color is currently out of stock. So I need to make a decision at some point, but I can hardly believe this desk at Walmart sells for less than half the price of the World Market version?! Plus, free shipping! Crazy town!

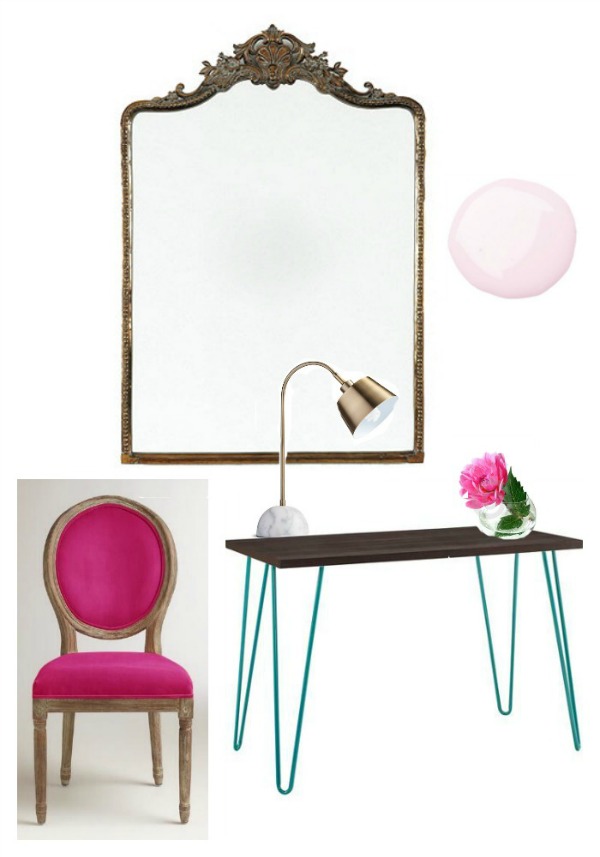
I like the idea of pairing this desk with a louis style chair like this one.


I'm envisioning something like this. I think having a mirror over the desk will not only brighten her one window space, but it will also make her desk dual function as a vanity. Which will be great as she's getting older, since she has to share a bathroom with her brother.

tween girls desk space  - hairpin desk, louis chair,
mirror, chair, desk, lamp, paint - Sherwin Williams Charming Pink

I'm telling you all, from now on, before I buy anything I'm going to check Walmart online first. I'm so impressed with all the great stuff they sell via their website, and I'm over here scratching my head as to why they don't sell more of this great stuff in stores? Have any of y'all ever seen this desk in a store? They also sell a hairpin coffee table and tv stand, both of which look pretty great for the price.

Have a Happy Halloween weekend! My kids are so pumped! I'm off to run a Harry Potter photo booth at my girl's school today - happy Friday friends!

Are renters their own worst enemies?

Rental costs have soared in recent years with no signs on the horizon of that changing.

However, are private renters their own worst enemies? Possibly, according to DIT’s lecturer in housing and economics, Lorcan Sirr.

He says that competition between tenants is so fierce that they are now out-bidding each other on properties. This is driving up the price of some rental properties by as much as 50%, he claims.

“There is a lack of supply of accommodation for people to rent,” Dr Sirr told the Herald.

“Landlords don’t really set the price. Tenants are out-bidding each other for the price.

“Under the legislation we have in Ireland, rent can be increased to the market level, which is being pushed up by 30%, 40% or 50%.

“It is unaffordable for people and causes them to move away to other places and you hear of kids going to stay with their granny, etc.”

Dr Sirr says there is not enough being done for renters compared to the provisions in place for homebuyers.

“We are happy to control affordability for people in the home ownership category,” he said. “But we won’t do it in the rental sector, which is wrong.

“People don’t really have security of tenure for what I would call spurious reasons, like the landlord needing the place back for themselves or for a family member.”

Dr Sirr says the Government should introduce more measures for the private rented market.

“Rent certainty is a very good thing and there is enough extensive and detailed research from the OECD and the National Economic and Social Council to show it is good in any civilised society,” he said.

“Rent certainty should be linked to the Consumer Price Index for a period of five years.

“The first thing I would do is provide 100pc mortgage interest relief for landlords. The system we have at the moment is not fit for purpose.”

Opposition parties have called for the Government to increase housing supply and introduce more measures to help those in the rented market.

What are your thoughts on the matter?

  • Are rents their own worst enemies?
  • Would rent certainty help the market?
  • Is there any hope of rents falling or stabilising in 2016?

Have your say below…

The post Are renters their own worst enemies? appeared first on MyHome.ie Advice & Blog.

Our Favorite Tools for Everyday, Crafts & DIY

With the number of questions and inquiries we have received regarding our favorite DIY tools over the years, it is crazy that it has taken me this long to compile a post on that exact subject.


We are a mixed bag of big projects (knocking down walls, installing floors, building storage and furniture....) and smaller, crafty DIYs (drawer organizers, decorative boxes, labels, memo boards....). Why we opt to DIY really varies from project to project; sometimes it allows us to create something bigger and better on a tighter budget, and other times it allows us to create something custom to exactly fit our style and needs.


Our tool arsenal has grown over the years, however, there are a few specific items that we find ourselves reaching for time and time again. Bryan and I sat down and came up with our top, "couldn't DIY without" products for everyday, crafting and DIY. We thought about the things we use most frequently, as well as the items we would purchase first if we had to start from scratch all over again.


For everyday repairs, installs and home maintenance, these are the items we keep in a nearby drawer and that we use more than any other tools:

  • Utility knife: Opening packages, slicing paper, scraping/cleaning glass
  • Safety glasses: Protective eye wear
  • Hammer: Quick hanging projects
  • Pliers: Tightening pipes, removing shelving pegs
  • Tape measure: Project planning, drawer liner installation
  • Flashlight: Power outages, viewing dark corners/crevices (cabinets, behind furniture, etc...)
  • Screwdriver: Removing electrical plates for painting, opening electronics, tightening furniture
  • Level: Hanging projects, furniture/maintenance checks

utility knife | safety glasses | hammer | pliers | tape measure | flashlight | screwdriver | level


When it comes to my daily organizing antics, here are the ten items that keep me excited and motivated to tackle any size project (in no particular order):

paper slicer
I utilize a paper slicer for cutting paper of all sizes, typically 12" x 12" sheets of scrapbooking paper. I also reach for my paper slicer when working with rolls of vinyl, making labels and cutting liner for smaller drawers and dividers. The slicer offers quicker, straighter cuts than I ever would be able to make myself with scissors.


silhouette die cutting machine
There aren't very many organizing projects that happen without the help of my Silhouette. What I love most is that it has the ability to make vinyl labels, which look professional and seamless on just about any drawer, bin or jar. It also offers a print and cut feature which is fantastic for sticker labels. The die cutting tool also has the ability to be paired with a variety of specialty papers to create projects out of gold foil, glitter and even iron-on fabric. In my opinion, the Silhouette is one of the most versatile craft tools around.


iron
I surprised myself with this one, but I do love my iron for a variety of small projects. Because I don't always get along with my sewing machine, an iron comes to the rescue with a slew of "no sew" options. I have done iron-on labels, new sew pouches and fabric covered boxes all with the help of this standard household tool.


craft brushes
Although the obvious use for these brushes is painting (which I love), I also reach for them for projects that include gold leafing, gilding, and decoupage.


color pens
I am able to get my daily color lovin' fix by using fine tip markers for writing notes, making labels and filling out my daily calendar, planner and to-do lists.


hot glue gun
Hot glue is great for working with rope, upholstery trim, labels, and just about any other small fabric or paper craft. I reach for my glue gun before I reach for the bigger tools, and typically am surprised about the amount of hold is provides.


laminator
My laminator basically acts as an insurance policy for my projects, especially when kiddos are involved. Most often I laminate labels to ensure they last for the long haul, but I also find myself laminating checklists (allowing them to be reused), as well as smaller drawer liners and the covers to my spiral-bound planners and notebooks.


staple gun
I generally use my staple gun for upholstery projects (playroom benches, dining chairs, headboards, stools, etc...), but it can also act as a fastening tool for small woodworking projects.


paint sprayer
If you love to spray paint, you will love having a small paint sprayer. This spray gun gives you the ability to turn any color paint into a spray paint, and it covers smoother than any brush or roller. Sprayers also provide consistent coverage and allow for you to get into awkward spaces easier than with typical painting tools.


cutting mat w/rotary tool
After I finally broke down and purchased an over-sized cutting mat and rotary tool, I questioned why I waited so long. It was life changing, especially for a girl obsessed with lining drawers and bookcases. I actually have two of the rotary cutting tools; one designated for fabrics and the other for paper projects. Talk about cutting like butta! Pair them with a yard stick and you will have the most beautiful and straight cuts for all of your crafty projects. #gamechanger


Now that you have my top ten, I am turning the mic over to Bryan to find out more about his top ten woodworking tools.

miter saw
Our miter saw is used for the majority of our woodworking projects, generally for cutting wood at specific angles. An invaluable tool for cutting trim and moulding, it is also one of the quickest ways to make any clean wood cuts. Just getting started with DIY? A miter box is a great alternative for smaller woodworking and moulding projects.


pedestal roller
The pedestal roller offers support and acts as an "extra set of hands" while working with longer or larger pieces of wood.


kreg jig
This tool provides the ability to create seamless exterior finishes by hiding the screw hardware inside of "pockets". A Kreg Jig is perfect for building boxes, cabinets and other decorative furniture in which you do not wish to see the fastening hardware as part of the end result.


aluminum cutting guide
A cutting guide is a carpentry tool designed for use with circular saws or routers to create accurate cuts over long distances. Although you can substitute a straight piece of wood or trim, the aluminum guide offers a sturdy, reliable and straight edge each and every time.


cordless drill
Rarely a day goes by where we don't reach for our cordless drill. Perfect for projects big and small, it can do everything from tightening furniture and hanging window hardware to constructing a full wall of built-ins. Sure, a screw driver can work, but your hands will be grateful for the ease and quickness this tool provides. Pair it with a "drill-flip-drive" bit and you can switch between your pre-drill and standard drill bit in one swift motion.


circular saw
A circular saw offers portability and flexibility with your cutting projects. When paired with saw horses and the aluminum cutting guide we shared above, it can take the place of a standard table saw. Although we have a table saw tucked in the corner of our garage, we gravitate towards this tool due to the ease of use and the overall flexibility it provides. Blades can also be swapped to be used with wood, stone and metal.


quick clamp
The squeeze clamp can expand to fit both small and large projects and offers padding to protect the wood finish. The squeeze option allows you to quickly set the clamp in place, it also comes with a quick release to protect the integrity of the project when removing the clamp. The clamp itself either acts as another set of hands for cutting or drilling, or holds wood pieces in place while your glues/adhesives work their magic.


sliding t-bevel
The T-bevel has a movable blade that allows you to copy any angle, from 0 to 360 degrees, and transfer it onto other surfaces such as moldings or lumber. This was a jumbo sized time saver for us while working with awkward ceiling and flooring angles.


brad nailer
Brad nailers utilize finishing nails, which are tiny in comparison to standard screws/nails. The small size of the nails makes this tool ideal for a magnitude of woodworking and trim projects in which you wish for the fastening hardware to be concealed (with wood putty or painter's caulk). All nailers will need to be paired with an air compressor, which provides the force to the tool. All of our trim work, crown, planks and moulding have been completed utilizing this fabulous piece of equipment.


jigsaw
Now watch me jig, and watch me nae nae.... No? Oh boy, my kids just hid in embarrassment... Anyway, we do like to do a little jig for this jigsaw tool, because it provides endless creative flexibility for cutting and shaping wood. Generally used for creating curved wood edges, it can also create intricate shapes and designs, even decorative typography. The small blade is the key to allowing the cutter to go places typical saws cannot reach. These blades are also interchangeable for cutting a variety of materials.


So there you have it, our absolute favorite tools and supplies. Each one of these tools make really wonderful Christmas, birthday and house warming gifts for others, or even for yourself! The majority of them are so wonderfully versatile and can be used for an endless array of projects for years to come.

Now that we have shared our favorites, we would love to know your personal DIY and craft supply loves. What items would you feel lost without? What tools do you find yourself grabbing for multiple times per week, month or year? Any other items that are game changers in your day-to-day projecting sessions?


Find my favorite painting supplies here.

* affiliate links used

Thursday, October 29, 2015

Five possible sites identified for modular housing in Dublin

Dublin City Council has selected five sites to house Ireland’s first modular homes.

According to RTÉ 22 are to be delivered by the end of the year with another 128 to be fast-tracked soon after.

The prefabricated houses will be used to provide emergency accommodation for homeless families.

The five sites are Poppintree in Ballymun, Mourne Road in Crumlin, Belcamp Avenue in Coolock, St Helena’s drive in Finglas and Cherry Orchard in Ballyfermot.

It is not yet clear how many homes will go on the proposed sites.

The locations are contained in a report prepared by the council and seen by RTÉ news.

In the report the council also says that families placed in these temporary homes will be assigned a support team to assist them in finding long term accommodation.

The tenants will also have to pay some form of rent.

The report also says that the units could be used in the long term as standard social housing or student accommodation.

The matters are due to be discussed at a meeting of the council tomorrow.

The post Five possible sites identified for modular housing in Dublin appeared first on MyHome.ie Advice & Blog.

Wednesday, October 28, 2015

inspired design - black bookcases

Thank you all so much for the kind comments on my pink door. I'm such a color lover, and it's always so much fun seeing the impact that paint can make on a space. I'm all ready to start my next painting project, and this time I'm going after the built-in bookcases in our living room.

sofa - pillow

The velvet sofa I ordered online arrived (I'll share more on that soon), and it's inspired me to get to work on our living room. Mainly because all I want to do now that this sofa has arrived is sit here with coffee or wine in hand (depending on the time of day, of course), flip through decor magazines while watching back to back episodes of Project Runway. All that sitting and loafing in this room is kind of giving me the hives as this room is still so, so, so far from the finish line. Seriously, it's like 10 paces back from the start line. #notkidding #thejoysofmoving

So, I'm ready to get my booty in gear and tackle my next painting project! New construction homes often lack the charm and character of older homes. I'm grateful this house has built-in bookcases on either side of the fireplace mantel, but they kind of get lost on the wall. And since I finally caved on the ol' TV over the fireplace tug-of-war (there's no where else to put it and have it make any kind of sense - I cave, hubs wins), I'm planning to go black. Check out all this yummy inspiration below.

inspired design - black bookcases -  design by Jenny @ Little Green Notebook

I've had a major design crush on Jenny from Little Green Notebook, for like ever. I just love her bold use of color and pattern. She mixes styles so flawlessly, and this space above is definitely lighting my design fire.

Black just makes everything come to life in such a beautiful way.

black bookcases
my domaine
It's so timeless and chic.

black bookcases - timeless and chic
elle
black bookcases
clements design
black bookcases - Todhunter Earle Interiors via Popsugar
Popsugar
I think the black will not only make the bookcases more of a focal point in the room, but it will also help to disguise the black TV over the mantel.

black bookcases  - everything just pops against a black background
Lonny
So, I've got my painting clothes on……..ready to get to work! What do you think about black bookcases? Yay or nay?


*affiliate links used

O’Donnellan & Joyce prepare for second autumn auction on November 13th

Galway-based auctioneers O’Donnellan & Joyce has announced its second autumn auction, which will take place in the Harbour Hotel, Galway, on Friday November 13th.

There are a large number of family homes in the city and surrounding areas and also many investment properties in areas including Limerick, Tipperary, Mayo, and Donegal, as well as Galway city and county. On offer on the day will be a number of apartment blocks and also some retail and commercial units.

For further details and open viewing times log on to www.odonnjoyce.com for full brochure and pictures of each property, or contact the O’Donnellan & Joyce auction team on 091 564212.

The last auction for 2015 will take place on Friday December 18. Anyone wishing to place a property for auction on that day should contact O’Donnellan & Joyce on 091 564212.

The post O’Donnellan & Joyce prepare for second autumn auction on November 13th appeared first on MyHome.ie Advice & Blog.

Monday, October 26, 2015

A Letter To My Daddy

Daddy,

Yesterday marked 5 years since you left for heaven. At times it seems like only days have passed, then there are others that it seems life forever since you left.

I know I don't have to write this letter and I hear you telling there is no need, because you already know what I am going to put down. Ok... so this letter is for me and my own mindset. You can just listen as I play it out on paper. Every other day I would just talk to you while driving to or from work, but Drew's truck is broke down, he has my car, and Jeffrey and I are carpooling. Yes, it saves us money and we should continue.

We finished the pens! It took a year in the making, but they are finished. We weaned this years spring calves just a few weeks ago. The pens work great! Jeffrey and Drew have worked so hard building them.

You told me the night before you left, to invest in my property, buy some cattle and grow slow. You assured me that was the right way to do it. We have done just that! The ranch isn't what it was back in the day, but it is alive and thriving. We have goals set and seem to reach them each year, just in time to set new ones. We continue to uphold that Rockin' B brand!

Weaned calves are now in pasture. Yes, they will be sold pre-conditioned, just like you taught me. We will take them to sale in mid November. We have been selling them at the sale barn near Tonya. That makes it nice to swing by and visit with them. The sale barn seems to treat us fairly. They now know who we are and let the buyers know the calves are pre-conditioned and in good shape. Last year, one of the buyers sought us out and complimented us on the calves. Jeffrey and Drew were so proud!

We bought a set of fancy heifers on Black Friday last year. They will be ready for the bull in December. I can't wait to see what their babies look like! These little girls didn't quite make the sellers show string. Daddy, they are so pretty! When they get close to their due date, we will bring them home to calve. Remember the days of baby watch? Thankfully the pens are just out the back door of the house.

Speaking of the house... It's been 3 years since the fire. Even though we are settled into a new normal, there seems to always be things left to do. The old shop next to the house has got to go! So does the shed in the back! I keep pushing for that to happen, but am quickly reminded of your words "All in due time."

I have noticed a change in myself and have guilted myself a few times these past months. Whenever I would have a problem, you were always the first I would reach to dial on my phone or want to call out to. It was September, I don't remember my issue but Jeffrey was my first go to guy. I felt guilt that I had called him on reaction and not you. Then I later realized this was a milestone for me. I have grown. I think of you every day, but manage my fears and anxiety much better now. Well... I say I do. The guys may tell you differently...

Drew is doing well! He and his Cattlemen's group placed 3rd with their homecoming float. The float was Drew's design! Daddy, that boy has a mind like you, when it comes to industrial, manufacturing and welding. The Cattlemen also placed 3rd in sweepstakes. Sweepstakes is all homecoming activities combined for the week. The AGR men also won house decoration and sweepstakes.

We had the Cattlemen at the house last evening for dinner. These young men are much like Tuff's group of college buddies. They are so well mannered and respectful. The difference is, not a single young man at the house yesterday has family living in Oklahoma. Jeffrey and I are happy to be their surrogate parents. We think we may even have a few for Thanksgiving.

Although Drew's first semester at school was a struggle, he has since changed his major and is headed in the right direction for who he is. He is balancing classes, work and his social schedule. He has accepted an internship, with Helena Chemical, starting this summer. He will do a bit of traveling, for training sessions, before being "planted" in Garden City, KS for the summer. Tuff has done his part in checking things out, like a big bother should. He says it will be an experience for Drew, as we all agree. Drew's excitement is easy to see and hard to contain!

The Big Kids.... Well.... They are going to have a baby! A baby girl at that! You already knew that too... Yes, I paid attention when you showed me. Daddy, they have named her Bower Marie! I tear up every time I write, think or hear her name. What an honor and tribute to you and our family! Oh you should see how pretty she is in her ultrasound photos! This is one time, I wish I were with you for just one quick peek into the future. February can't get here quick enough! Darb is so cute with her little belly! Tuff is one proud Daddy! They are going to be amazing parents!

They are preparing for her arrival, just as you would expect them too. Their house is for sale, actually under contract. They have a new home to move into already. You would approve of the new home. It is all one level. Bower's nursery will be close to the big kid's room. No more worries of two stories and stairs.

Jeffrey is shopping for ponies and saddles, and we have Miss Bower Marie's first heifer picked out. She is so spoiled and she isn't even here. I told a friend, "My boys were raised there is a difference between "want' and "need". I am not sure that rule applies to Miss Bower!" Aunt Lois is excited to get started on nursery decor. The Big Kids will be home for Thanksgiving, as well. I'm sure Aunt Lois will have her list ready, sewing machine threaded and on standby.

I had fears and have always questioned my parenting abilities with the boys. Somehow, I have no fears of being a MooMaw to a pretty little frilly COWgirl! Even though frills and bows are a whole new world to me, I know Miss Bower and I will make it just fine! I just need her MooPaw to keep the checkbook flowing. I fear that since of financial responsibility, you instilled in the boys and I, may go out the window with this little one.

Day jobs are going well for us all too. We are all so busy running different directions, but always seem to come together often. I know you are proud of us, how we have grown and the things we have accomplished. Traditions have changed since you left us, but you are always here. There are times I look and can see you watching us. You are smiling your big smile, with your toothpick in your mouth, and you nod your head. That's all I need!

I Love You Too!

How We Added Landscape Lighting

This is a project we did over the summer and kept meaning to Instagram, but it refused to be contained by the limits of one shot just like the writers of The Walking Dead refuse to care about our VERY REAL FEELINGS about very fictional characters. But I digress. So here we are, swinging by like we mentioned we might randomly do in our update post/podcast.

We had filed this idea away for waaaay down the line (thinking it would be cost and time intensive), but turns out it was actually neither. In fact, as the sun set on the very same day that we started, we got to enjoy the finished product.

How-We-Added-Landscape-Lights

We’ve always gawked lustily at the homes in our neighborhood with landscape lighting (so stately!). You know, that welcoming come-hither glow in the evening hours. And when we saw Sarah at Thrifty Decor Chick post this tutorial, it quickly leapt to the top of our to-do list. I’ll fess up that we didn’t photograph the installation process very thoroughly (read: at all), but the whole connecting wires part was pretty straight-forward.

LandscapeLights-LightsOn-PulledBack

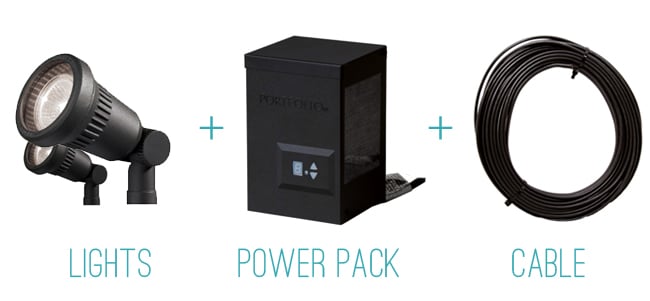
It was the planning and buying of materials that made our heads spin just a little – mostly because there was a smattering of math and some proper material selections that had to happen. Based on the ingredients of this soup-to-nuts $99 lighting kit that Sarah mentioned, we knew we needed three basic elements: lights + a power pack + cable. It was getting the right combination of these that put the ol’ noggin to work.

LandscapLights-3-Elements

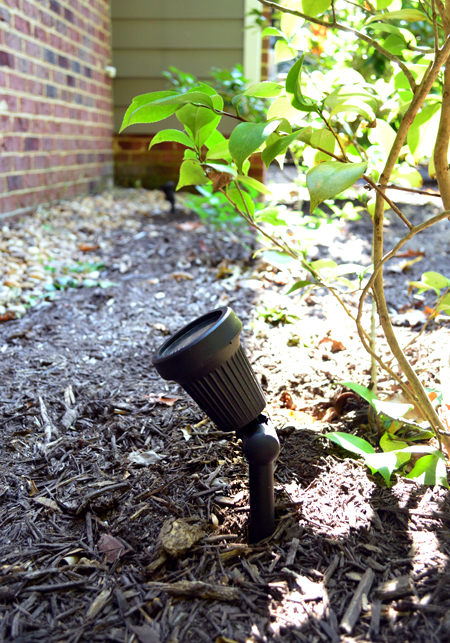
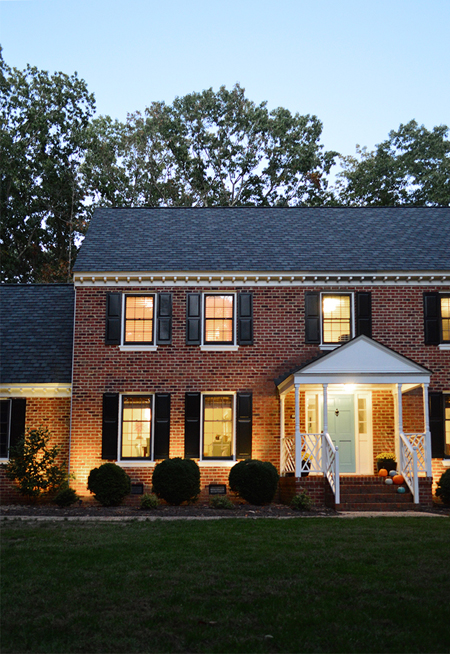
The lights were the easy part, since we stuck with the same 20W halogen spotlights that came in that kit. And it also didn’t take much research (scoping houses online and around our ‘hood) to determine that we wanted one between each downstairs window and on the house’s front corners, so we bought enough to fill those spots.

The power pack is where it started to get math-y. Also called a transformer, its job is to convert your outlet’s 120V electricity to the 12V low-voltage that these lighting systems run on. But it’s up to you to make sure you have one with enough power to illuminate all of your lights. So you add up the total wattage of all of your fixtures (in our case, 20 Watts X 9 lights = 180 Watts) and then choose a power pack with enough wattage, plus a little extra (at Lowe’s they suggest at least 20W extra). We chose a 200 watt transformer, which just plugs into any exterior outlet, and made sure it was a “multi-tap” version (meaning we could connect or “tap in” more than one wire). Which leads us to another thing we learned along the way…

The cable also requires some forethought. You typically want to keep your cable as short as possible (voltage drops the farther you get from your power source) and you risk your last light looking dimmer than your first one if you connect too many lights on any one long length of cable. So there are all sorts of strategies and charts for wiring your lights for the most even placement of lights along your wires (there are also other charts like this one to help tell you what size/gauge wire you should be buying). We split our lights onto two separate sections of similar-length 14-gauge cable, each running to either side of the front porch based on some of those recommendations.

LandscapeLights-LightsOn

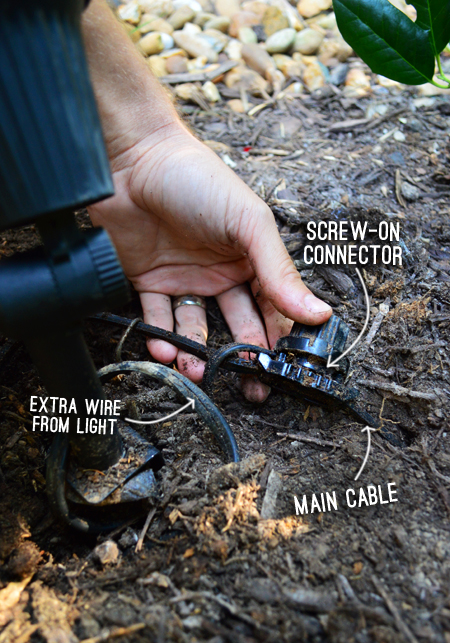
Again, once we knew where everything was going, the actual wire-connecting, light-placement, and wire-burying was a cinch. You do all the wire connecting before the transformer is plugged in (three cheers for no live wires to worry about while you work!) so first we staked our spotlights into the ground and loosely laid our cable along them. Then we just connected each light to the main cable by screwing the light’s connector cap tightly over the cable according to the installation instructions – no tools needed. Below is a connection we unearthed this weekend so you can sorta see what it looks like.

LandscapeLights-Connector-Daytime

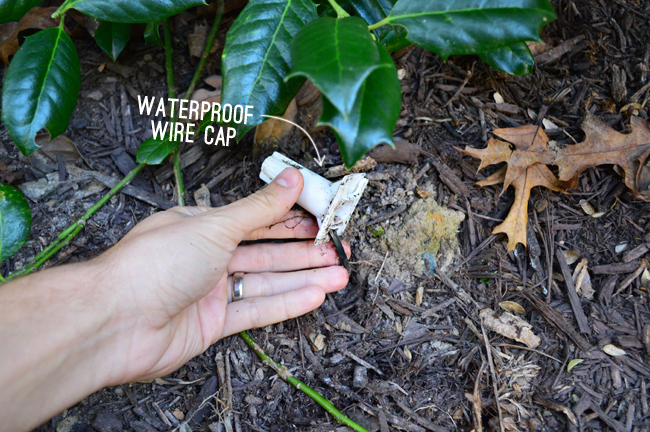
Since we used two cables instead of one long one that loops back to the transformer box, we did have to figure out what to do with the outside ends of each cable. After some research we went with waterproof wire caps which are made to withstand moisture and corrosion (we hear they’re great for buried applications like this).

LandscapeLights-WaterproofCap-Daytime

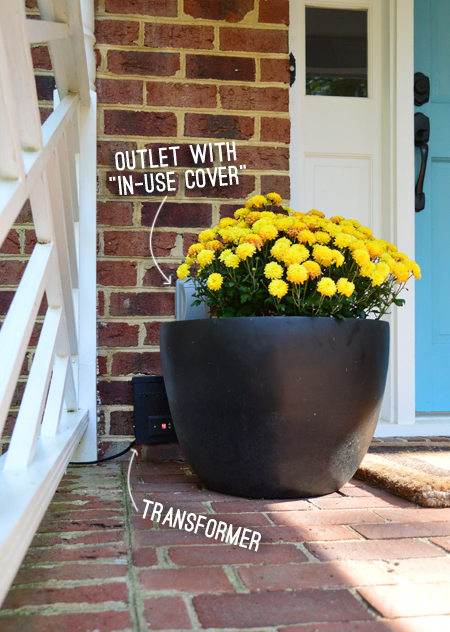
Then it was time to connect the cables to the underside of the transformer, which did call for some basic wire clippers to expose the end of the wires. Once we did that, we could plug the transformer into the outlet on our front porch, and mount it to the brick to keep it a few inches off the ground (both for looks and in case of any post-rain porch puddles). We nudged the planter to the side for this photo, but it normally hides the box and outlet from view.

LandscapeLights-Transformer-Daytime

Once we had connected everything and plugged in the transformer, we used the darker evening light to fine tune everything (like tweaking the angle of the spotlights and the placement of the stakes) to make sure we liked how the light was hitting the house. There’s about a foot of cord between the light and where it attaches to the cable, so even after everything’s connected you’ve got some wiggle room to move lights around a bit if needed.

After we were done tweaking our placement at night, all we had to do was dig everything in when we had some daylight the next morning. So we dug a small trench a few inches below ground level and buried all of the exposed cables, connectors, and wire caps. Since they’re all contained within the bounds of our mulch bed, it’s nice that we don’t have to worry about cutting anything with an aerator or some other lawn tool.

LandscapeLights-UpClose-Daytime

As you can see in the time-lapse video below they automatically turn on when it gets dark thanks to a light sensor on the power pack. It also has a digital timer where you can set how many hours they stay on (ours go off around the time we hit the hay). We love that they’re so auto-pilot and in total I think they cost us a little over $200 and took about four hours to install.

Oops, sorry, that’s just a video of a cat dressed up like a pirate. My bad. Here’s the right one:

Oh, and check out the set-up we used to capture the video above. Why yes, that’s a selfie stick clamped to an old stepladder (we used the iPhone’s time lapse feature and then went inside for dinner while it did its thing). I’m sure the neighbors were scratching their heads over that one.

LandscapeLights-Filming-Set-Up

We’re happy to report that these lights have been going strong for quite a few months and we still get excited whenever we roll down the street at night and they’ve already clicked on, ready to welcome us home. We think they’ll be especially nice on a weekend like this one coming up, both for guiding trick-or-treaters on Saturday and for coping with the earlier sunset after our clocks “fall back” on Sunday. Speaking of coping, I have some strongly worded Walking Dead fan-mail to draft…

LandscapeLights-Vertical450